
Main Courses
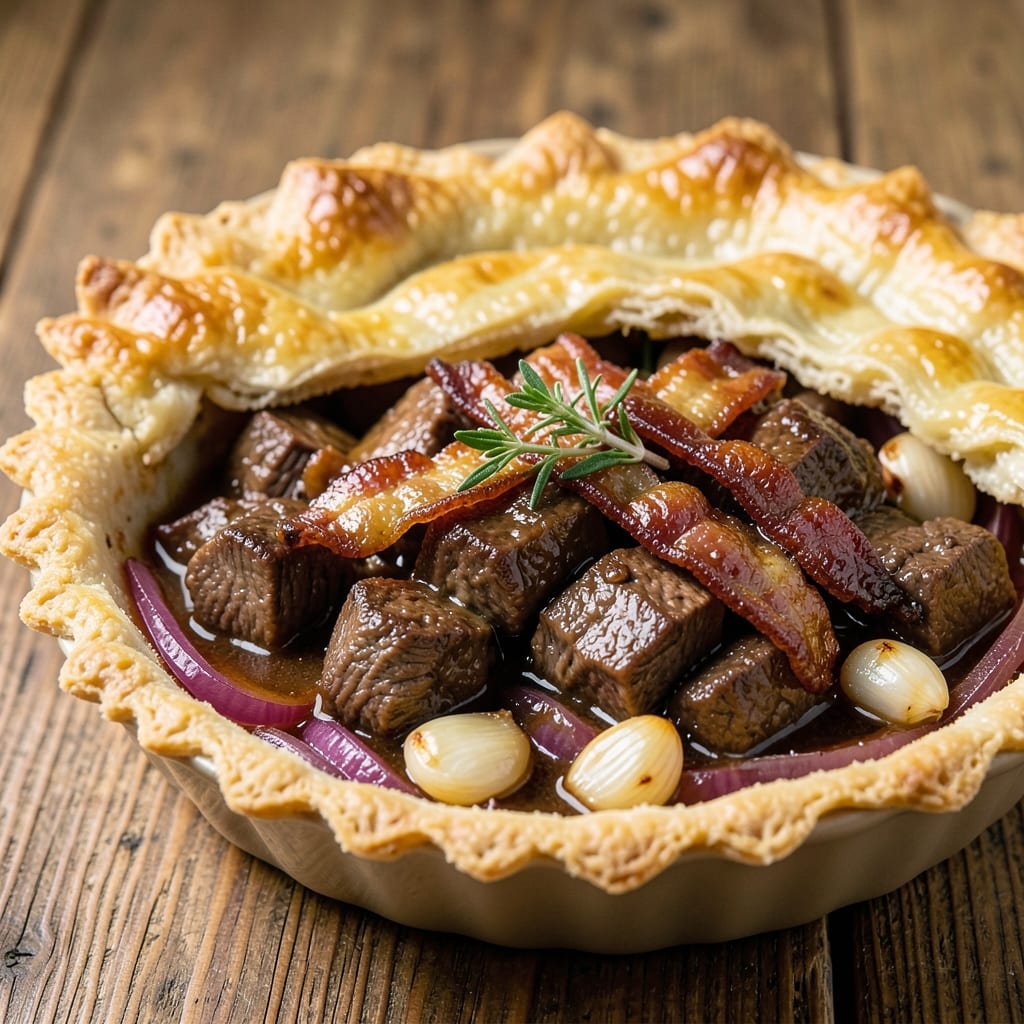
This beef and bacon pie recipe delivers restaurant-quality results with a flaky pastry crust that's impossible to resist. The secret lies in layering tender beef, crispy bacon, and aromatic herbs beneath golden, buttery pastry—creating a dish that feels both comforting and impressive. I've perfected the balance between rich filling and crispy crust, ensuring every bite delivers that perfect combination of textures and flavors.
What sets this recipe apart is the technique: a partially blind-baked crust that stays crisp even after holding the weight of the savory filling. While traditional recipes call for homemade pastry, I've included a reliable store-bought alternative that doesn't compromise on flakiness. The filling simmers just long enough to develop deep flavors without becoming dry, while the bacon adds that essential smoky crunch.
By the time it emerges from the oven, you'll have a pie with a golden, shatteringly crisp crust and a filling that's perfectly tender yet flavorful. The aroma alone will have everyone gathering at your table—this is the kind of dish that transforms an ordinary dinner into something special. The best part? It's approachable enough for weeknight cooking while still feeling like a celebration.
Serve with a simple green salad or buttery mashed potatoes to balance the richness. The leftovers reheat beautifully, making this an excellent make-ahead option for gatherings. Let's get started on creating this comforting classic that's sure to become a family favorite.
Ingredients for beef and bacon pie
Sixteen ingredients for a pie that tastes like a hug from your favorite restaurant chef.
| Ingredient | Amount | Notes |
|---|---|---|
| Flaky Pie Crust (Store-Bought or Homemade) 🥧 | 1 package | Puff pastry or all-butter crust preferred |
| Beef Chuck Roast 🥩 | 2 ½ lb | Cut into 1-inch cubes, trimmed of fat |
| Thick-Cut Bacon 🥓 | 12 oz | Chopped into 1/2-inch pieces |
| Yellow Onion 🧅 | 1 whole | Diced into 1/4-inch pieces |
| Garlic Cloves 🧄 | 4 cloves | Minced finely |
| Fresh Thyme Leaves 🌿 | ½ cup | Stems removed, chopped |
| Fresh Parsley Leaves 🌿 | ¼ cup | Chopped for garnish |
| Beef Stock 💧 | 1 ½ cups | Low-sodium preferred |
| Red Wine 🍷 | ½ cup | Dry, like Cabernet Sauvignon |
| Tomato Paste 🍅 | 2 tbsp | Smooth, not chunky |
| All-Purpose Flour 🌾 | 2 tbsp | For thickening filling |
| Unsalted Butter 🧈 | 2 tbsp | Cold, cubed for crust |
| Diamond Crystal Kosher Salt 🧂 | 1 ½ tsp | Adjust to taste |
| Freshly Ground Black Pepper 🌶️ | ½ tsp | Coarsely ground |
| Egg (Optional) 🥚 | 1 whole | For egg wash |
The crust is where this pie shines. Puff pastry from Trader Joe's or Whole Foods delivers that signature flakiness without the fuss, but if you're feeling ambitious, homemade all-butter crust is worth the effort. Look for beef chuck with good marbling—Kroger's or Costco usually carry high-quality cuts. The bacon should be thick-cut (none of that paper-thin stuff) and preferably from a local butcher if you want that extra smoky flavor. Fresh thyme and parsley make all the difference—skip the dried if you can, but if you must, use half the amount. For the red wine, anything bold and dry works here—Cab Sauv, Merlot, whatever's open.
No beef stock? Chicken stock with a splash of soy sauce gets you close, though the flavor won't be quite as deep. Running short on red wine? Beef broth with a tablespoon of balsamic vinegar mimics the acidity. The tomato paste can be swapped for crushed tomatoes (1/4 cup) if that's what you've got, but it'll add moisture. For the crust, if you're using store-bought, check the label—some brands contain butter, others contain margarine. All-butter is non-negotiable for that golden finish. The egg wash is optional but recommended for that glossy, restaurant-worthy look. If you're avoiding eggs, brush the crust with milk or cream instead.
This pie reheats beautifully—450°F for 15-20 minutes until the crust is golden again. Store leftovers in an airtight container for up to 4 days, or freeze portions for 3 months. The filling actually tastes better the next day as the flavors meld. For make-ahead prep, assemble the pie (unbaked) and refrigerate for up to 24 hours before baking. The crust will thank you for the rest. If you're serving a crowd, double the recipe—this pie is always a hit at gatherings.
Why You'll Love This Recipe
- One-Pan Magic: Honestly, I love when a recipe lets me use just one pan—less cleanup, more time for the good stuff. The beef and bacon practically cook themselves while you slice onions and minced garlic, then tuck everything into that flaky crust. (Yes, even on a Tuesday night.)
- Smoky-Savory Bomb: That thick-cut bacon? It cracks during baking, blanketing the beef with salty, crispy shards while the chuck roast stays tender. The onions caramelize right in the oven—no fancy steps, just pure, rich flavor that makes the pie taste like a hug from your grandma.
- Leftovers for Days: Between us, this pie is that good you’ll want to reheat it. The crust stays crispy (if you’re lucky), and the beef gets even more fall-apart tender. I make a double batch on Sundays—lunch one day, dinner the next, and still have leftovers for sandwiches. (My kids call it "pie for breakfast," and I don’t correct them.)
- Budget-Friendly Feast: Here’s what sold me—the beef chuck roast is affordable, and bacon stretches further when you render the fat. A single onion and a few garlic cloves bulk up the filling, and store-bought crust keeps it simple. For under $15, you feed four people a meal that feels like a restaurant dish. Not bad, right?
Step-by-step instructions for beef and bacon pie
Here's how to create a rich, savory pie with layers of tender beef, crispy bacon, and a golden pastry crust.
Brown the Bacon and Sear the Beef
Start by cutting the 2.5 lb beef chuck roast into 1-inch cubes and patting them dry with paper towels. Heat a large Dutch oven over medium-high heat and add the 12 oz chopped thick-cut bacon in a single layer. Cook for 8-10 minutes, stirring occasionally, until the bacon is deep golden brown and crispy. Remove the bacon with a slotted spoon and set it aside, leaving the rendered fat in the pot.
Increase the heat to high and add the 1-inch cubed beef chuck roast in batches, being careful not to overcrowd the pot. Sear the beef for 3-4 minutes per side until it develops a deep brown crust. This step is crucial—it locks in flavors and creates a rich foundation for the filling. Once all the beef is browned, remove it from the pot and set it aside with the bacon.
Build the Flavor Base with Aromatics
Reduce the heat to medium and add the diced yellow onion to the Dutch oven. Cook for 5-6 minutes until the onions soften and begin to caramelize, stirring occasionally. Add the 4 minced garlic cloves and the 2 tbsp tomato paste, stirring to combine. Cook for another 1-2 minutes until the garlic is fragrant and the tomato paste darkens slightly.
Pour in the 0.5 cup red wine and scrape up any browned bits from the bottom of the pot. Let the wine simmer for 2-3 minutes until it reduces by half, intensifying the flavors. This step deepens the richness of the filling and ensures every bite is packed with savory notes.
Thicken the Filling and Season
Sprinkle the 2 tbsp all-purpose flour over the mixture in the Dutch oven and stir vigorously for 1-2 minutes until the flour is fully incorporated and the filling begins to thicken. Gradually pour in the 1.5 cups beef stock, stirring constantly to prevent lumps from forming. Bring the mixture to a gentle simmer and let it cook for 5-7 minutes until it thickens slightly and coats the back of a spoon.
Return the browned beef and bacon to the pot, along with the 0.5 cup chopped fresh thyme leaves, 0.5 tsp freshly ground black pepper, and 1.5 tsp Diamond Crystal kosher salt. Stir gently to combine and let the filling simmer for another 5 minutes to allow the flavors to meld. Taste and adjust the seasoning if needed—this is your chance to balance the richness of the meat and bacon.
Assemble and Bake the Pie
Preheat your oven to 375°F. Roll out the flaky pie crust on a lightly floured surface and transfer it to a 9-inch pie dish, pressing it gently into the bottom and up the sides. Spoon the beef and bacon filling into the crust, spreading it evenly. Fold the edges of the crust over the filling to create a sealed edge, crimping them with your fingers or a fork to ensure a neat finish.
Cut 2 tbsp unsalted butter into small cubes and place them on top of the filling. Brush the crust with a beaten egg (optional) for a golden finish. Bake the pie for 45-50 minutes until the crust is deep golden brown and the filling is bubbling. If the crust begins to brown too quickly, cover it loosely with aluminum foil to prevent burning.
Rest and Serve
Remove the pie from the oven and let it rest for 10-15 minutes before slicing. This resting time allows the filling to set slightly and makes it easier to serve without spilling. Garnish with the 0.25 cup chopped fresh parsley leaves just before serving to add a pop of color and freshness.
Serve the pie warm, cutting into wedges to reveal the layers of tender beef, crispy bacon, and flaky pastry. The filling should be rich and savory, with a perfect balance of herbs and spices. Pair it with a simple green salad or crusty bread to complete the meal.
Pro Tips For Making Beef And Bacon Pie
- Sear the Bacon First: I used to cook the bacon right in the pie dish, and it made a mess—grease everywhere, crispy bits sticking to the crust. Instead, fry the thick-cut bacon in a cold skillet first (yes, cold—it renders cleaner). Once crisp, drain on paper towels and lay it directly over the beef in the pie. The fat stays where it belongs, and the bacon adds flavor without turning the crust soggy.
- Cut the Onion Thin: Thick onion slices won’t caramelize properly in the time it takes the beef to cook. Slice the yellow onion paper-thin (almost translucent) so it softens and sweetens alongside the meat. Pro move: Toss the slices in a pinch of salt and let them sit for 10 minutes before cooking—this draws out moisture so they crisp at the edges instead of steaming.
- Blind-Bake the Crust: Skipping this step is how you end up with a pie crust that’s more pudding than pastry. Weigh down the unbaked crust with pie weights or dried beans, then bake at 375°F (190°C) for 12–15 minutes before adding the filling. Brush the hot bottom with a little egg wash afterward—it seals in flavor and guarantees a crisp base, even if the filling is juicy.
- Use a Meat Thermometer: Guessing when beef chuck is done leads to either dry, overcooked meat or undercooked chunks that ruin the whole dish. Pull the roast at 195°F (90°C) internal temp—it’ll rest and carryover cook to 203°F (95°C), which is perfect for shredding or slicing. If you don’t have one, err on the side of undercooking slightly and let it rest 15 minutes under foil before assembling the pie.
Make-ahead tips for this beef and bacon pie
Prep Ahead Strategy
Assemble the pie the night before and refrigerate it uncovered for 12-24 hours. This chilling step creates a crispier crust by drying it out slightly—just what you want for that perfect golden finish. I always do this when hosting dinner parties; it cuts down on last-minute stress and ensures the crust won't sog from the filling. 💫
Freezer-Friendly Assembly
For long-term prep, assemble the unbaked pie and freeze it completely before baking. Wrap tightly in plastic wrap followed by aluminum foil to prevent freezer burn. When ready to bake, thaw overnight in the fridge, then bake as directed—no need to adjust cooking time. This method works perfectly for holiday meals or unexpected gatherings.
Filling Prep Shortcut
Make the filling up to 3 days ahead and refrigerate it in an airtight container. When ready to assemble, simply reheat the filling gently in a saucepan over low heat until warmed through. This saves you from starting from scratch on busy days while keeping all the rich flavors intact.
Crust Pre-Baking Tip
If you're really ahead of schedule, blind-bake the crust up to 2 days ahead and store it at room temperature in an airtight container. To prevent sogginess, place a sheet of parchment paper on top of the baked crust before sealing. When ready to assemble, simply add your pre-made filling and bake as usual—this ensures your crust stays perfectly crisp.
Make-Ahead Baking Hack
For a truly stress-free experience, bake the pie completely ahead of time and reheat before serving. Wrap the cooled pie in aluminum foil and store at room temperature for up to 2 days. To reheat, place on a baking sheet and warm in a 350°F oven for 20-25 minutes until the crust is golden and the filling is steaming hot. This works especially well for potlucks or family gatherings.
Portion Control for Leftovers
Divide leftover pie into individual portions and freeze them in single-serving containers. Reheat each portion in the microwave for 2-3 minutes on medium power, then finish under a broiler for 1-2 minutes to crisp the crust. I always keep a few portions frozen so I can serve restaurant-quality pie with minimal effort during busy weeks. ✨
Nutrition facts
Frequently asked questions
Can I substitute ground beef for the chuck roast?
While ground beef works in a pinch, it won't give you the same tender, melt-in-your-mouth texture. The chuck roast provides better flavor and juiciness when cooked slowly. If you must substitute, use 80/20 ground chuck and reduce the cooking time by 10 minutes to prevent drying out.
How do I keep the crust from getting soggy?
Prevent a soggy bottom by blind-baking the crust for 10 minutes at 375°F before adding filling. Place pie weights or dried beans on parchment paper, then remove them before adding the filling. For extra insurance, brush the bottom crust with egg white before filling.
What's the best way to reheat leftovers?
Slice the pie into portions and reheat in a 350°F oven for 15-20 minutes covered with foil, then uncover for the last 2-3 minutes to crisp the crust. For microwave reheating, use 50% power for 1-2 minutes, then finish under the broiler for 1 minute.
Can I make this pie without red wine?
Replace the wine with 1/2 cup beef broth plus 1 tablespoon balsamic vinegar for acidity. Or use 1/2 cup apple cider for a slightly sweet contrast. The wine adds depth, but these substitutes work well in a pinch.
How long can I keep this pie in the fridge?
Store in an airtight container for up to 4 days in the refrigerator. For longer storage, freeze portions for 3 months. The flavors actually improve overnight as the ingredients meld together. Just reheat properly to maintain that perfect crust texture.