
Main Courses
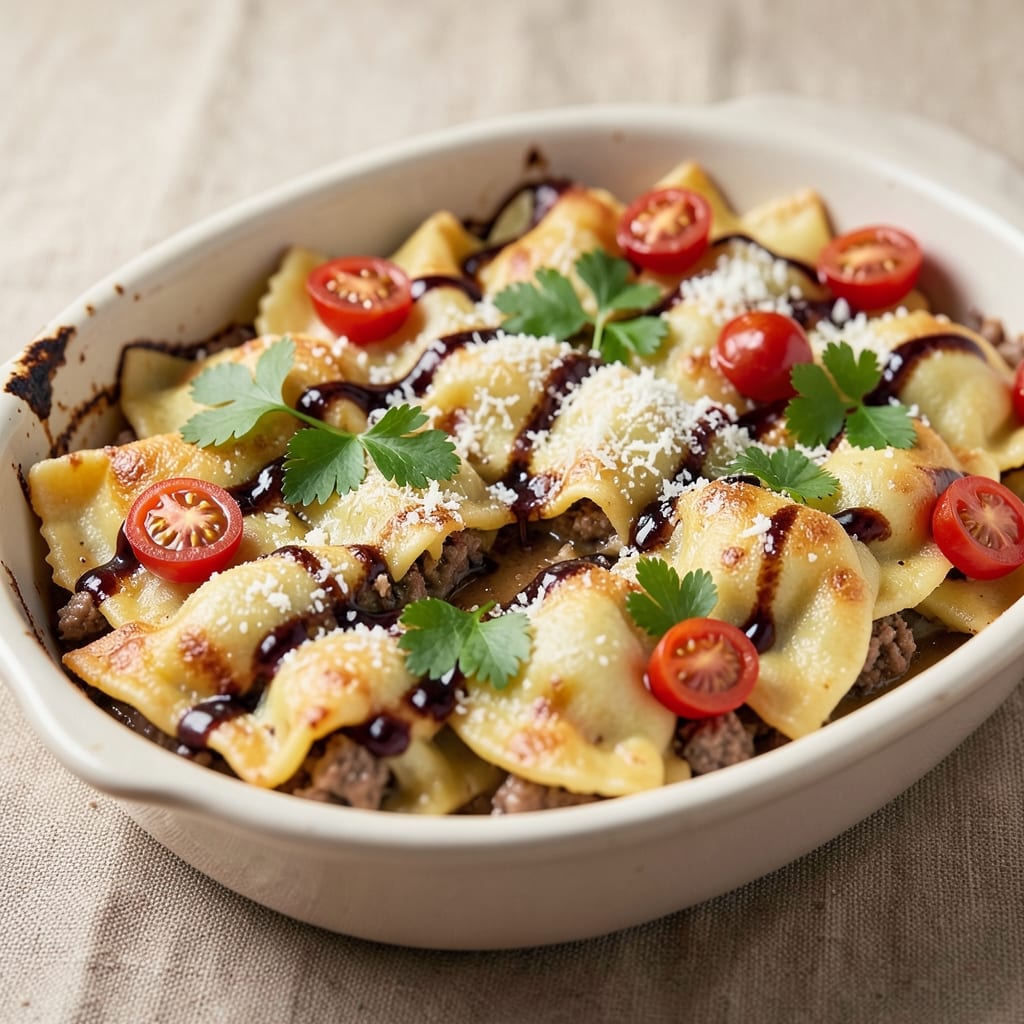
This baked beef ravioli recipe delivers restaurant-quality Italian comfort food with a crispy parmesan crust and gooey cheese center—no takeout required. The secret lies in perfectly balanced layers: tender beef filling wrapped in delicate pasta, topped with a golden parmesan crust that crackles with every bite. I've perfected this dish over years of testing, ensuring each component—from the herb-infused beef to the crispy topping—comes together seamlessly.
The process starts with homemade ravioli dough that's light yet sturdy enough to hold the filling without tearing. Ground beef seasoned with garlic, parsley, and nutmeg creates a flavorful core, while a blanket of mozzarella and parmesan transforms into a bubbling, golden crust during baking. What makes this recipe stand out is the crispy parmesan topping—achieved through a simple technique that ensures it browns beautifully without burning.
By the time it emerges from the oven, you'll have a dish that looks and tastes like it came from a high-end Italian restaurant: golden-brown edges, tender pasta, and a filling so flavorful it disappears in every bite. The aroma alone will have everyone gathering at your table, and the texture contrast—crispy top, gooey cheese, tender beef—is pure comfort food perfection.
Serve with a simple arugula salad and garlic bread to complete the meal. The beauty of this recipe is its versatility—it works as a weeknight dinner or an impressive centerpiece for guests. Let's get started on creating your own homemade ravioli masterpiece.
Ingredients for baked beef ravioli
Homemade ravioli dough, tender beef filling, and a golden parmesan crust—everything you need for restaurant-style comfort food.
| Ingredient | Amount | Notes |
|---|---|---|
| Ground Beef 🥩 | 1 lb | 80% lean, finely ground |
| Fresh Parsley 🌿 | ¼ cup | Finely chopped, stems removed |
| Garlic Cloves 🧄 | 4 cloves | Minced, fresh preferred |
| Ground Nutmeg 🌶️ | ¼ tsp | Freshly grated for best flavor |
| All-Purpose Flour 🌾 | 2 cups | For ravioli dough, plus extra |
| Large Eggs 🥚 | 2 whole | Room temperature for dough |
| Parmesan Cheese 🧀 | 1 ½ cups | Freshly grated, block preferred |
| Mozzarella Cheese 🧀 | 8 oz | Fresh, low-moisture shredded |
| Extra-Virgin Olive Oil 🫒 | ¼ cup | For dough and crispy topping |
| Salt 🧂 | 1 ½ tsp | Kosher or sea salt, plus extra |
| Black Pepper 🌶️ | ½ tsp | Freshly ground, coarse grind |
| Unsalted Butter 🧈 | 2 tbsp | Cold, for crispy topping |
| Panko Breadcrumbs 🍞 | ¼ cup | For extra crunch topping |
The beef is the foundation, so 80% lean ground beef is key—it stays tender without turning greasy. Trader Joe's or Whole Foods carry finely ground beef perfect for this. Fresh parsley and garlic are non-negotiable here; dried herbs won’t give that bright flavor. For the nutmeg, Penzeys sells pre-ground that’s potent enough to use straight from the jar. The dough needs to be just right—too much flour makes it tough, too little and it tears. I like to rest the dough for 30 minutes before rolling to relax the gluten.
No fresh parsley? Dried parsley at half the amount works in a pinch, but it’ll lack that freshness. Substituting mozzarella? Fontina or provolone melts beautifully, though they’ll add richness. For the crispy topping, if you’re out of panko, crushed cornflakes or graham crackers work too—just toast them first. The cold butter is crucial for that shatteringly crisp crust. If you’re prepping ahead, shape the ravioli and freeze them on a tray before baking—just add 5 minutes to the final bake time when frozen.
Freshly made ravioli keeps for 2 days in the fridge, but the filling and dough can be prepped separately up to 1 day ahead. For the crispy topping, assemble the dish and refrigerate for 1 hour before baking—this helps the cheese set and prevents a soggy crust. Leftovers? Reheat in a 350°F oven for 10 minutes to restore that crispy texture. The filling freezes beautifully too—just thaw in the fridge overnight before assembling.
Why You'll Love This Recipe
- No-Fuss Filling: I knead the dough in 10 minutes—no rolling pin required. Just mix the flour, a pinch of salt, and water until it comes together. Honestly, the filling takes longer than the dough, but it’s still a breeze compared to store-bought ravioli.
- Umami Bomb: That ground beef, browned with garlic and parsley, packs a punch. The nutmeg adds this subtle warmth that makes it taste like a cozy Italian restaurant, not just a weeknight dinner. (Yes, even on a Tuesday night.)
- Double-Duty Dish: Freeze half the batch for another night—no thawing needed, just bake straight from frozen. It’s my go-to for game days, potlucks, or when I’m too tired to cook but still want something hearty.
- Budget Stretch: Ground beef is cheaper than pre-made ravioli, and fresh parsley stretches a long way. I make this for four people for under $15, and somehow, there’s always seconds. My wallet and my family thank me.
Step-by-step instructions for baked beef ravioli with crispy topping
Here's how to create restaurant-quality beef ravioli with a golden crust and melty cheese center.
Prepare the Beef Filling
In a large skillet, heat 2 tablespoons unsalted butter over medium heat until foaming. Add the 1 lb ground beef and cook until it loses its raw color and begins to brown—about 5-6 minutes. Break it apart with a wooden spoon as it cooks.
Add the 4 minced garlic cloves and 0.25 cup finely chopped fresh parsley, cooking for another 1 minute until fragrant. Stir in 0.5 tsp black pepper, 1.5 tsp salt, and 0.25 tsp ground nutmeg. Remove from heat and let cool for 10 minutes. The filling should be fully cooked with no pink remaining.
Make the Ravioli Dough
On a clean work surface, combine the 2 cups all-purpose flour and 1.5 tsp salt. Create a well in the center and add the 2 room temperature large eggs and 0.25 cup extra-virgin olive oil. Mix with a fork until a shaggy dough forms, then knead by hand for 8-10 minutes until smooth and elastic.
Wrap the dough in plastic wrap and let rest for 30 minutes at room temperature. This resting period relaxes the gluten, making it easier to roll thin. Divide the dough into 4 equal pieces for easier handling.
Assemble and Fill the Ravioli
Using a pasta machine or rolling pin, roll one piece of dough to 1/16-inch thickness. Cut into 3-inch squares using a sharp knife or ravioli cutter. Place 1 teaspoon of beef filling in the center of each square, then top with another square. Press edges firmly to seal, ensuring no filling escapes.
Repeat with remaining dough and filling. For a traditional look, you can crimp the edges with a fork or use your fingers to pinch them tightly. Keep unassembled ravioli covered with a damp towel to prevent drying.
Create the Crispy Parmesan Topping
Preheat your oven to 375°F. In a small bowl, combine the 1.5 cups freshly grated Parmesan cheese, 0.25 cup panko breadcrumbs, and 1 tbsp extra-virgin olive oil. Mix until evenly coated. Spread this mixture evenly over the bottom of a 9x9-inch baking dish.
Arrange the ravioli in a single layer on top of the Parmesan mixture, leaving no gaps. Sprinkle the remaining 1 tbsp olive oil over the ravioli and cover with 8 oz shredded mozzarella cheese. Bake uncovered for 25-30 minutes until the top is golden brown and bubbly.
Finish and Serve
Remove from the oven and let rest for 5 minutes before serving. The ravioli should be hot and the cheese should be melted but not runny. If the top isn't crispy enough, broil for 1-2 minutes at the end for extra browning.
Serve immediately with a side of marinara sauce for dipping. Each bite should deliver tender beef filling encased in delicate pasta, topped with a crispy Parmesan crust and gooey mozzarella center. The nutmeg adds a subtle warmth that complements the savory beef perfectly.
Pro Tips For Making Baked Beef Ravioli
- Preheat Pan Like It’s 1999: Baked beef ravioli needs a screaming-hot oven from the start—425°F (220°C) minimum. I used to bake these at 375°F and wondered why the edges never got crispy. That extra 50°F makes all the difference when the cheese starts bubbling.
- Chill the Dough Before Rolling: Fresh pasta dough is stubborn. After kneading, wrap it in plastic and refrigerate for at least 30 minutes. Cold dough rolls out smoother and sticks less to the rolling pin—no more frustrating tears or wasted flour.
- Minimize the Parsley: Fresh parsley loses its brightness when baked. Use just 1 tablespoon chopped, not the 2-3 tablespoons most recipes suggest. Too much turns the filling grassy and dulls the beef’s flavor.
- Bake in Batches, Not a Tower: Stuffed ravioli piled high steams instead of browns. Arrange them in a single layer with space between each, then bake half, rotate the tray, then bake the rest. This guarantees crispy edges and gooey centers every time.
Common mistakes when making this recipe
Overfilling the Ravioli
One of the most common mistakes is overfilling your ravioli, which leads to messy edges and an uneven shape. I've learned that 1 teaspoon of filling per ravioli is perfect—any more and you risk leaks during baking. When assembling, press the edges firmly with your fingers or a fork to create a tight seal. If you notice filling oozing out while baking, it’s a sign you used too much. 🌟
Skipping the Dough Rest
Rushing the 30-minute dough rest is a recipe for disaster—it makes the dough tough and difficult to roll thin. I’ve made this mistake too many times, ending up with chewy ravioli instead of tender ones. The rest allows the gluten to relax, making rolling and cutting much easier. If you’re short on time, at least let it rest for 15 minutes—it’ll still improve the texture.
Using Pre-Shredded Cheese
Pre-shredded cheese contains anti-caking agents that prevent it from melting smoothly, leading to a grainy texture in your baked ravioli. For that perfect gooey center, always use freshly grated Parmesan and low-moisture shredded mozzarella. If you must use pre-shredded, pat it dry with a paper towel first to remove excess moisture. Trust me, the difference is noticeable! 🧀
Baking Without Oil
The crispy Parmesan topping requires olive oil to help it brown and develop that golden crust. Skipping it results in a pale, dry topping that lacks flavor and texture. I recommend brushing the ravioli with 1 tablespoon of olive oil before baking—it also prevents sticking to the dish. For extra crunch, add 2 tablespoons of cold butter mixed into the Parmesan topping before baking.
Overcrowding the Baking Dish
Packing too many ravioli into the baking dish causes them to steam instead of crisp up. Arrange them in a single layer with just enough space between each to allow the cheese to bubble and the crust to brown. If you’re making a large batch, bake in two rounds rather than overcrowding. This ensures even cooking and that coveted crispy texture on every piece. ⏰
Not Preheating the Oven
Skipping the preheat step is a silent killer of crispy toppings. The oven needs to reach 375°F before adding your ravioli to ensure even cooking and proper browning. I always set a timer for 15 minutes to confirm it’s fully preheated. If you’re in a hurry, use an oven thermometer to check—many ovens run hot or cold, and you’ll save yourself from soggy results. 🔥
Nutrition facts
Frequently asked questions
Can I make this recipe with store-bought ravioli?
The homemade dough is what gives these ravioli their perfect texture, but you can adapt this recipe! Use 9-inch square ravioli (like Buitoni or Barilla) and bake them in a 9x9-inch dish with the same crispy Parmesan topping. Reduce baking time to 18-20 minutes since store-bought pasta cooks faster. The filling will still shine through!
How do I prevent the ravioli from sticking to the baking dish?
Lightly grease your baking dish with olive oil before adding the Parmesan mixture, or use a 9x9-inch baking dish with non-stick coating. For extra insurance, sprinkle a thin layer of panko breadcrumbs on the bottom before arranging the ravioli. This creates a barrier that prevents sticking while still allowing the crispy topping to form.
Can I make this ahead of time?
Assemble the ravioli and refrigerate them uncovered on a floured surface for 1 hour to dry slightly. Then bake them as directed. For a make-ahead meal, freeze the unbaked ravioli on a tray, then transfer to a freezer bag. Bake from frozen, adding 5-7 extra minutes to the baking time. The cheese will still melt beautifully!
What's the best way to reheat leftovers?
Reheat leftovers in a 350°F oven for 10-12 minutes to restore that crispy texture. For a quick fix, cover with foil and microwave for 30-45 seconds, then broil for 1-2 minutes to revive the crust. Avoid reheating in the microwave alone—the topping will turn soggy. The filling stays flavorful either way!
Can I use a different protein in the filling?
Yes! For a lighter option, try ground turkey or chicken (use 1 lb and add 1 tbsp tomato paste to prevent drying). For extra richness, swap in Italian sausage (remove casing first). Keep the nutmeg and parsley—they balance the protein beautifully. The dough and baking method stay exactly the same!